INTRODUCTION
In this lesson your students will be able to explore various forms of non-verbal communication as well as discussing hearing impairments and learning some British Sign Language.RESOURCES FOR THIS LESSON
These are the resources that will be referred to during this lesson.Starter Activity
Main Activity 1
Main Activity 2
Main Activity 3
Plenary Activity 4
STARTER ACTIVITY
In this starter activity the class will think of ways to communicate with each other without speaking.
Set up a timer with an alarm (on a Smart Board ideally). Explain to your class that they have 3 minutes in which to position themselves in a line along one of the classroom walls. Tell them that they must be arranged in order of their birthdays through the year (not in age order) – starting with January at one end and ending with December at the other. While doing this they must not talk or make any noises with their mouth. Ensure that they understand the instructions and then begin the timer. While this activity is taking place do not give any prompts other than to inform them of the time remaining and to remind them that they should not be speaking. Try to observe the different methods that are being used to achieve the task. Once the time is up ask the students, in order, to call out their birthdays to see how effectively this has been completed.
Once the class have returned to their places have a discussion with them about how difficult they found the task. Ask them to explain the techniques that they used to accomplish the task and talk about other ways that it may have been achieved. Examples of this could include:
- Holding up fingers to represent the numbers of months and dates
- Writing in the air
- Mouthing / Lip-reading
- Writing down on a piece of paper
- Sign language
- Pointing at a calendar
Explain that these methods of communication are known as “non-verbal communication” (apart from writing, which is ‘written communication’) *. If the class does not come up with all of the above methods then discuss them as alternatives to what they have come up with.
* For the purposes of this lesson we are defining non-verbal communication as communication that is not written and does not involve the voice. There are other slightly varying definitions.
MAIN ACTIVITY 1
This activity works best if a projector or Smart Board is available however the slideshow can be shown on a computer monitor or printed out. The slideshow is available in PowerPoint and PDF format from the resource section above.
This slideshow consists of a series of 12 photographs each containing a person who is using a form of non-verbal communication. Have a brief discussion around each photograph thinking about the aspects that show non-verbal communication. Discuss the importance of facial expression and body language and how these features are very important components of communication. Also ask the class what they believe the person in the photograph is trying to communicate. Your class will probably find they are already pretty expert at recognising the meaning of non-verbal communication!
The final image in the slideshow is of two people using sign language. As part of your discussion about this image ask the class what they know about sign language. Prompt the discussion with questions such as “who would use sign language?” . Encourage the class to discuss the fact that people who are Deaf or have a hearing impairment might use sign language to communicate if they are unable to hear speech clearly.
Ask the class if they know anyone who is Deaf or has a hearing impairment. Encourage them to think about people such as their grandparents who may have developed a hearing impairment as they got older. It is important at this point to explain that many people who have a hearing impairment can still hear but may need a hearing aid to boost certain sounds. Explain that not all people who have a hearing impairment use sign language. Sign language is used most often by people who were born profoundly deaf or became deafened at a young age (perhaps through illness or injury). People who have a mild hearing loss are unlikely to use sign language as they will probably have enough hearing, possibly with the help of a hearing aid, to use speech.
Explain to the class that sign language is a completely separate language to spoken English and it comprises of a mixture of hand signs, gestures, and body language. Your students may be surprised to find out that sign language is not the same in every country around the world - sign languages have evolved around the world in the same way that spoken languages have, resulting in different countries having different signed languages. The sign language used in the UK is called British Sign Language – known as BSL for short. Recent calculations estimate that in the UK there are around 156,000 people who use British Sign Language as their first language (see http://www.bda.org.uk/News/127).
MAIN ACTIVITY 2
In this activity the class is going to learn some British Sign Language. This is a great skill to learn for when they meet someone who uses BSL but it is also fun to be able to hold secret conversations with each other without other students (or teachers!) knowing what they are talking about.
Begin by explaining to the class that almost every English word or phrase has it’s own BSL sign however for words that do not have a sign, such as names, and for words that you do not know the sign for, you can spell the English word using the BSL fingerspelling alphabet. Each letter of the alphabet has it’s own sign and this is the best place to begin learning BSL.

A PDF version of this chart can be downloaded and printed from the resources section above along with a slideshow (PowerPoint and PDF) containing each letter on an individual slide.
Provide each member of the class with a printed copy of the BSL fingerspelling alphabet and then as a whole group, also using the alphabet slideshow if you wish, briefly go through the alphabet to demonstrate each letter.
The class can now split into small groups to go through the alphabet again. Ask each student to learn their own names using the fingerspelling alphabet and then encourage them to test each other’s fingerspelling skills by spelling their names to each other – you might like to ask for a couple of volunteers to spell their names to the whole class.
MAIN ACTIVITY 3
Ask the class if they know any sign language signs other than the fingerspelling alphabet. If anyone does know any signs then ask them to teach a sign that they know to the rest of the class. Next tell the class that you are going to demonstrate 3 BSL signs and they need to guess what they mean.Show or demonstrate the 3 signs from the resources section above - "hello", "good", "drink".
Your class will probably already know and use these signs without realising that they are actually BSL signs.
Display on the projector, or distribute paper copies, of the “Greetings” page (this could also be put up on the classroom wall somewhere for future reference).
This illustration shows the BSL signs for some common greetings:

As a class, or in small groups, go through each of these signs and try to learn as many of them as possible. For more details of each sign you can visit www.british-sign.co.uk/dictionary
PLENARY ACTIVITY
This activity will reinforce with the students the idea of non-verbal communication and will also expand their BSL vocabulary.
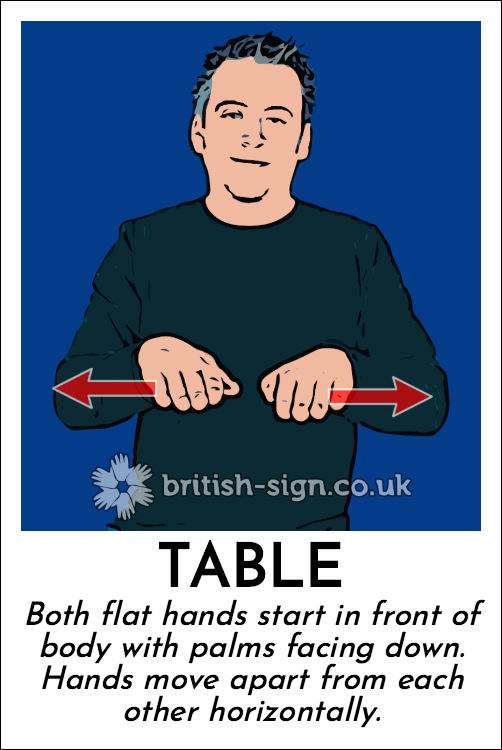
As a whole class, begin the ‘Guess the Signs’ slideshow. This is best viewed on a Smart Board or projected but can also be downloaded and printed.
The students will be shown a slide containing a single word, for example; ‘cow’. Ask the students to make up a sign or movement that could be used for ‘cow’ (remind students that they must not use speech – only gestures). This slideshow displays a single word on a slide, then the illustration of the BSL sign for that word on the following slide showing. Before revealing the illustration for each sign select one or two students to share with the class what they think the sign might be. Once they have had a go at guessing the sign reveal the illustration and encourage students to practice the true BSL sign with you, before moving onto the next word.
CONTINUATION IDEAS
CONTINUATION IDEAS
- Encourage the class to greet each other each day with one of the BSL signs from the greetings poster.
- Print out and display in your classroom additional BSL vocab posters from www.british-sign.co.uk
- Encourage students to practice and improve their fingerspelling skills by using the online “3 minute fingerspelling challenge” – www.british-sign.co.uk/challenge
- Ask the students to use the fingerspelling word printing tool at www.british-sign.co.uk to print fingerspelling labels for your classroom.
- Visit www.british-sign.co.uk/dictionary and browse the dictionary to learn more BSL signs.